Linear Algebra for GLSL Shaders
02 / Meet the vectors

From points
to vectors.

Use two positions to describe a movement. Then change its size, reverse it, and start it somewhere else.

20–30 min with experimentsGLSL ES 3.00 / WebGL 2After chapter 01
What we want to make

An arrow between two points.

Move the points ↓

A and B tell us where the arrow starts and ends. Their difference tells us what movement connects them.

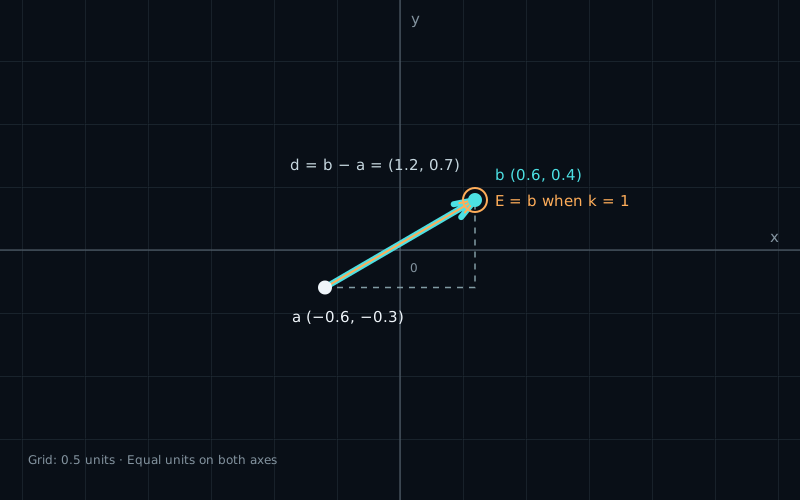
Point A at (-0.6, -0.3) and point B at (0.6, 0.4), connected by an arrow. Its components are 1.2 units right and 0.7 units up.
Position → displacementStart at A. Add B − A. Arrive at B.

In the previous chapter, we gave each pixel an address. Now let’s put two points on that grid and draw an arrow from one to the other.

Moving a point changes the arrow. Moving both points together moves the whole arrow, but keeps its direction and size. We want to describe these two operations with code.

We will keep the same coordinates: zero at the center, positive Y upward, and equal units on both axes. If those choices are unfamiliar, start with chapter 01.

One type, two meanings

Look at this pair of values:

vec2 value = vec2(0.4, 0.2);

It can describe a point: a position 0.4 units right of the origin and 0.2 units above it. Or it can describe a displacement: move 0.4 units right and 0.2 units up from wherever you start.

The numbers are the same. Their meaning is different. A point answers “where?” A displacement answers “how much does the position change?”

GLSL stores both in vec2. It does not know which meaning we intend. Names such as position, center, and displacement help us keep track of it.

A displacement is a vector. We draw it as an arrow to show its direction and size, but the vector itself does not require a particular starting point. The same displacement can start at A, at the origin, or somewhere else.

Find the movement from A to B

Our starting point is A. Our destination is B:

vec2 a = vec2(-0.6, -0.3);
vec2 b = vec2( 0.6,  0.4);

To find the required movement, subtract the starting position from the destination:

vec2 displacement = b - a;

Subtraction works component by component:

// X: 0.6 - (-0.6) = 1.2
// Y: 0.4 - (-0.3) = 0.7
vec2 displacement = vec2(1.2, 0.7);

So we need to move 1.2 units right and 0.7 units up. The horizontal and vertical guides in the playground show these two changes separately. The diagonal arrow shows their combined result.

Those guides help us read the components. They do not mean that an object must first move horizontally and then vertically. The vector describes the total change, not a required path or speed.

Order matters. For the movement from B to A, we swap the subtraction:

vec2 back = a - b; // (-1.2, -0.7)
// Also: back = -displacement;

Both signs change. Right becomes left; up becomes down. The arrow now points in the opposite direction.

Build the endpoint

Once we have a displacement, add it to a starting point:

vec2 end = a + displacement;

With our values, the result is (-0.6 + 1.2, -0.3 + 0.7), which gives (0.6, 0.4). We have arrived at B.

This gives us two useful operations:

Point − point = displacement

Point + displacement = point

Now start the same movement at (0, 0):

vec2 otherStart = vec2(0.0);
vec2 otherEnd = otherStart + displacement; // (1.2, 0.7)

The arrow has moved, but the displacement is still (1.2, 0.7). Its components belong to the movement, not to its location.

A common mistake is to write a + b when we want to reach B from A. GLSL accepts it, but it adds the coordinates of two positions. In this example it gives (0.0, 0.1), which is neither B nor the displacement. Decide what the result should mean before choosing the operation.

Make the movement smaller — or reverse it

Multiply a vector by a number to scale both components by the same amount:

vec2 halfStep = displacement * 0.5; // (0.6, 0.35)
vec2 tip = a + halfStep;           // (0.0, 0.05)

We made half of each change, so the new endpoint is halfway from A to B. More generally:

vec2 tip = a + k * (b - a);

k is a scalar: one number, unlike the two components in our vector. It scales the movement from A. It does not scale A itself.

The same displacement, five scale values
kScaled displacementEndpoint from A
0(0, 0)(-0.6, -0.3) — A
0.5(0.6, 0.35)(0, 0.05) — halfway
1(1.2, 0.7)(0.6, 0.4) — B
2(2.4, 1.4)(1.8, 1.1) — beyond B
-1(-1.2, -0.7)(-1.8, -1.0) — opposite direction

A positive value keeps the direction. A negative value reverses it. Zero gives the zero vector, vec2(0.0): no movement, with no direction to draw.

There is an important difference between a + k * displacement and k * (a + displacement). The first keeps the start at A. The second also scales A, so it scales the final position relative to the origin. Try k = 0: the first stays at A; the second moves to zero.

Move both points together

Let’s move the whole arrow by an offset (0.3, -0.2): right by 0.3 and down by 0.2.

vec2 offset = vec2(0.3, -0.2);
vec2 movedA = a + offset; // (-0.3, -0.5)
vec2 movedB = b + offset; // ( 0.9,  0.2)

vec2 sameDisplacement = movedB - movedA; // (1.2, 0.7)

The new positions are different, but their difference is unchanged. We added the same offset to both, and subtraction cancels it:

// (b + offset) - (a + offset) = b - a

This is a translation: every point receives the same displacement. It moves the arrow without changing its direction or size.

Try the common-translation controls below. A and B should move together while the readout for B − A stays fixed. If that readout changes, the points did not receive the same offset.

Try it

Two points. One movement.

LIVE GLSL / WEBGL 2

Drag A or B, or change their coordinates with the controls. Watch B − A. Then change the scale k and move the pair together. Before each change, predict where the scaled endpoint will go.

This view is zoomed out by a factor of 2: its vertical range is -2 to 2. Both axes still use the same unit. A large scale or translation can move an endpoint outside the canvas; the numerical result remains valid.

Default example: a at (-0.6, -0.3), b at (0.6, 0.4). The displacement is (1.2, 0.7); k is 1, so E equals b.
White dot: aCyan dot / arrow: b, dAmber ring / arrow: E, k × dDashed: X and Y changes

Equal units, with a fixed 2× zoom-out. Visible range: x from −3.2 to 3.2, y from −2 to 2. Grid: 0.5 units. The drawing buffer is 800 × 500; one unit is 125 buffer pixels on either axis.

Scale the displacement 1.00

Base point A

Each component: −1 to 1.

Base point B

Each component: −1 to 1.

Move both points

Add the same shift t to A and B.

Preparing the live shader.

Base A · uA
(−0.60, −0.30)
Base B · uB
(0.60, 0.40)
Common shift · t
(0.00, 0.00)
Displacement · d = b − a
(1.20, 0.70)
Displayed a = A + t
(−0.60, −0.30)
Displayed b = B + t
(0.60, 0.40)
Scaled displacement · k × d
(1.20, 0.70)
Endpoint · E = a + k × d
(0.60, 0.40)

The cyan and amber arrows overlap at k = 1. The amber ring marks their shared endpoint.

Select a point for the keyboard:

Keyboard target: base point A. Focus the diagram, then use arrow keys to move that point by 0.05; hold Shift for 0.25. Drag a dot with a mouse. On touch screens, the sliders are the easiest way to move vertically while keeping page scrolling available. Sliders and number fields change the base points; the common shift is added afterward.

Open the complete shader edit · run · reset

The page supplies uA, uB, uTranslation, uScale, and uResolution. The drawing helpers build the arrows and grid. For now, experiment with the four lines under “The lesson” in main(). All helper code is included. The numerical readouts follow the formulas in their labels; editing the shader does not change those calculations.

⌘ / Ctrl + Enter to run

The arrow drawing code is a supplied helper. Its job is to make the vector visible. We will study distance, direction, and projection in later chapters; here, focus on the values passed to it.

Use the endpoint to place a shape

We do not need an arrow to use a vector. Let’s place a small circle at the scaled endpoint. This complete fragment shader runs in the editor above:

#version 300 es
precision highp float;

uniform vec2 uResolution;
uniform vec2 uA;
uniform vec2 uB;
uniform vec2 uTranslation;
uniform float uScale;
out vec4 fragColor;

void main() {
    vec2 p = (2.0 * gl_FragCoord.xy - uResolution) / uResolution.y;
    p *= 2.0; // Match the playground's wider view.

    vec2 a = uA + uTranslation;
    vec2 b = uB + uTranslation;
    vec2 displacement = b - a;
    vec2 center = a + uScale * displacement;

    vec2 local = p - center;
    float circle = 1.0 - smoothstep(0.09, 0.11, length(local));

    vec3 background = vec3(0.04, 0.06, 0.09);
    vec3 fill = vec3(0.29, 0.88, 0.56);
    fragColor = vec4(mix(background, fill, circle), 1.0);
}

The page passes the two base positions through uA and uB, the common offset through uTranslation, and the scale through uScale. The controls still work after you replace the shader. The grid and arrows disappear because this version only draws the circle. Reset restores the full example.

The circle mask is the same distance tool we used in chapter 01, with a smaller radius. We will explain length in the next chapter. The new part is how we calculate its center.

Why do we add here, but subtract there?

To move an object forward, add a displacement to its position:

vec2 movedCenter = center + offset;

To draw it, each fragment asks a different question: “Where am I relative to that center?” Subtract the center from the fragment position:

vec2 local = p - movedCenter;

This is the vector from the center to the current fragment. At the center itself, p == movedCenter, so local is zero. Our distance test fills the area around that zero.

For example, a center at (0.4, 0.2) appears right and above the origin. Subtracting it in the sampling formula produces exactly that movement. Writing p + center instead puts the local zero at -center, so the circle appears on the opposite side.

Your turn

Reset the playground to A = (-0.6, -0.3), B = (0.6, 0.4), zero translation, and k = 1.

  1. Calculate the displacement from B back to A. Then swap the two positions in the controls and check the arrow.
  2. Reset. Apply a common translation of (0.3, -0.2). Predict both new positions and check that B − A stays the same.
  3. Keep that translation and set k = -0.5. Calculate the scaled displacement and endpoint before checking the image.
  4. Set k = 0. Then set A and B to the same position and try several values of k. Explain why the scaled displacement has no direction in either case. At k = 0, the original A-to-B arrow can still remain as a reference.
  5. Paste the small circle shader into the editor. Change p - center to p + center. Predict the position, run it, then restore the subtraction.
A hint

Keep three values separate: the starting point, the displacement, and the endpoint. Calculate them in that order. A negative scale reverses the displacement; it does not swap the two stored points.

Check your result

From B to A, the displacement is (-1.2, -0.7).

After translation, A is (-0.3, -0.5) and B is (0.9, 0.2). Their difference remains (1.2, 0.7).

With k = -0.5, the scaled displacement is (-0.6, -0.35). Add it to the translated A to get the endpoint (-0.9, -0.85).

At k = 0, the scaled displacement is zero and the endpoint is A. When A equals B, the original displacement is already zero, so every scale gives the same result.

Using p + center puts the circle at -center. If the center happens to be zero, both formulas look the same; choose a nonzero center to see the difference.

What you can do now

You can separate a position from a displacement, calculate b - a, and build a new endpoint with a + k * displacement.

Here is the check: move both points by the same offset and their displacement must stay unchanged; use a negative scale and the arrow must reverse while keeping its start at A. At zero, the scaled arrow must become a point without a direction; the original A-to-B arrow remains as a reference.

We can now describe a movement with two numbers. Next, we will turn those components into one useful value: the distance between the points.