Linear Algebra for GLSL Shaders
03 / Meet the vectors

How far is
that pixel?

Measure the distance from a pixel to a point. Use that one number to draw a circle, soften its edge, and make a ring.

20–30 min with experimentsGLSL ES 3.00 / WebGL 2After chapter 02
What we want to make

One distance. Several shapes.

Measure a point ↓

A filled circle keeps the pixels near its center. A ring keeps only the pixels near its boundary. Both start with the same measurement.

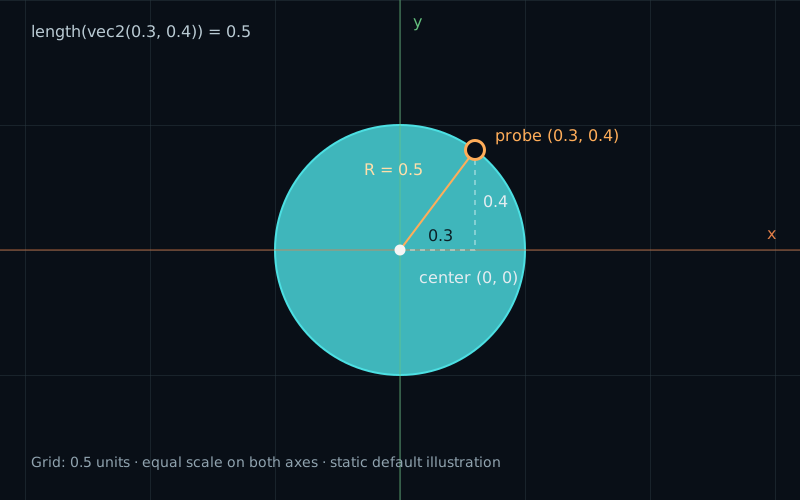
A circle centered at zero with radius 0.5. A probe at (0.3, 0.4) lies on the boundary: its horizontal and vertical offsets form a right triangle with length 0.5.
Displacement → distance0.3 across, 0.4 up, 0.5 from the center.

In chapter 02, subtracting two positions gave us a displacement. We knew how far to move along each axis. Now we want the straight-line distance between those positions.

This answers a useful drawing question: is this pixel close enough to our center to belong to a circle? We already used length to draw small circles. Let’s open that part of the code.

Measure the displacement

Place the center at (0, 0) and a point at (0.3, 0.4). The displacement from the center is:

vec2 center = vec2(0.0);
vec2 point = vec2(0.3, 0.4);
vec2 v = point - center; // (0.3, 0.4)

The horizontal and vertical steps form the two short sides of a right triangle. The straight line connecting the points is its long side. The Pythagorean theorem gives its length:

// length² = horizontal² + vertical²
float len = sqrt(v.x * v.x + v.y * v.y);
// sqrt(0.09 + 0.16) = sqrt(0.25) = 0.5

Adding the components would give 0.7. That measures the route along the two sides, not the straight line. Squaring, adding, and taking the square root gives the distance we need.

GLSL provides this operation directly:

float len = length(v);

The result is one nonnegative number, in the same units as the vector. Negative components work too: (-0.3, 0.4) has length 0.5, because squaring removes the signs. A zero vector has length zero.

Length discards direction. Many different vectors have the same length. That is exactly what makes this operation useful for drawing a circle: every direction must receive the same distance test.

A number at every pixel

Replace the single point with the current fragment’s position. Keep the equal-unit coordinates from chapter 01:

vec2 p = (2.0 * gl_FragCoord.xy - uResolution) / uResolution.y;
vec2 displacement = p - center;
float distanceToCenter = length(displacement);

p and center are positions in the same space. Their difference points from the center to this fragment. Its length is zero at the center and grows as we move away.

A value defined throughout space is a field. Here we have a distance field. To inspect it, map small distances to a dark color and larger distances to a brighter one. The playground’s distance view uses this mapping:

float brightness = clamp(distanceToCenter / 1.0, 0.0, 1.0);

The chosen display range is zero to one coordinate unit. clamp keeps the color weight between zero and one; distances above one share the brightest color. The measurement itself is still available in the readout.

Points at equal distance receive equal brightness, forming circular bands. Move the center and the whole field follows it. The rule has no preferred horizontal or vertical direction.

Find the boundary

Choose a radius of 0.5. The simplest filled circle keeps every fragment whose distance is smaller than the radius:

float radius = 0.5;
float circle = distanceToCenter < radius ? 1.0 : 0.0;

This value is a mask: one means filled, zero means background. Strictly, the filled region is a disk; the circle is its boundary. We will use “circle” for the familiar filled shape and say “boundary” when the distinction matters.

Subtract the radius to move the threshold to zero:

float distanceToCircle = distanceToCenter - radius;

This is a signed distance to the circular boundary. Its magnitude measures the shortest distance to that boundary; its sign identifies which side we are on.

Radius 0.5, three distances from the center
Distance to centerMinus radiusMeaning
0.2-0.3Inside, 0.3 from boundary
0.50.0On boundary
0.7+0.2Outside, 0.2 from boundary

At the center, the signed distance is -radius, not zero. Zero distance to the center and zero distance to the boundary describe different places.

Give the edge a width

The hard comparison switches immediately from one to zero. On a pixel grid, its outline can look jagged. Let’s replace that switch with a short transition:

float edge = 0.015; // Half-width of the transition, in coordinate units.
float circle = 1.0 - smoothstep(-edge, edge, distanceToCircle);

Treat smoothstep as a small shaping tool: it returns zero below the first threshold, one above the second, and a smooth change between them. Subtracting from one makes the inside filled and the outside empty. At the boundary, our mask is 0.5.

The transition extends from -edge to +edge, so its total width is 2 * edge. Keep edge > 0; equal or reversed thresholds have undefined behavior. For a hard edge, use the comparison above.

We blend the background and fill with mix(background, fill, circle). A mask of zero selects the background, one selects the fill, and intermediate values blend them. We will study that blending operation in chapter 05.

This softness is measured in coordinate units, not pixels. A fixed value looks wider in pixels on a larger canvas. It is a deliberate visual transition, not automatic pixel-perfect antialiasing.

Keep a narrow band around the boundary

For a ring, we want pixels near the boundary on either side. The sign no longer matters. abs gives the unsigned distance to the circular boundary:

float distanceToOutline = abs(distanceToCircle);

Choose a full ring thickness of 0.12. Half of that thickness lies on each side of the original circle:

float thickness = 0.12;
float ringDistance = abs(distanceToCircle) - thickness * 0.5;
float ring = 1.0 - smoothstep(-edge, edge, ringDistance);

With radius 0.5, the ring’s inner and outer boundaries are at distances 0.44 and 0.56 from the center. Those are the mask’s half-strength boundaries; softness spreads around them.

Thickness and softness do different jobs. Thickness sets the band’s size. Softness sets the transition at its edges. If softness exceeds half the thickness, the transitions overlap and even the middle of the ring no longer reaches full strength.

Try it

Measure before you draw.

LIVE GLSL / WEBGL 2

Switch between the disk, ring, and distance field. Move the measuring point P and compare its distance with the radius. Change the center with the controls; the measuring point stays in place.

This view returns to chapter 01’s scale: Y runs from -1 to 1, and X uses the same unit. There is no extra zoom. The measuring point reports the built-in formulas; editing the shader does not change those reference calculations.

Static default example: a disk centered at (0, 0), radius 0.5, and a probe at (0.3, 0.4). The probe is 0.5 units from the center and lies on the circle.
White dot: centerAmber ring: probeCyan: mask

Equal units; no extra zoom. Vertical range: −1 to 1. Grid: 0.5 units. One unit occupies half the canvas height on either axis.

All lengths use the same coordinate unit. Edge is always positive. Full width changes the ring; it does not change the disk.

Center
Probe

Preparing the live shader.

Center
(0.00, 0.00)
Probe
(0.30, 0.40)
Displacement · probe − center
(0.30, 0.40)
Distance to center · length(displacement)
0.500
Signed circle distance · d = length − R
0.000
Ring value · abs(d) − w / 2
−0.060

The probe is on the circle: its distance to the center equals the radius.

Readouts evaluate the built-in formulas at the probe. They do not sample the rendered image or execute edits to the shader.

Click or drag in the diagram to move the probe. Focus the diagram and use arrow keys for steps of 0.05; hold Shift for 0.25. On a touch screen, tap a location or use the controls; a swipe scrolls the page. Center and probe controls range from −1 to 1. A shape near the edge can extend outside the view.

Open the complete shader edit · run · reset

The page supplies the resolution, center, probe, radius, full ring width, positive edge, and view (0 = disk, 1 = ring, 2 = distance field). The lesson is the distance and mask calculation in main(). Grid, markers, and color blending are supplied drawing helpers. Their complete code is included.

⌘ / Ctrl + Enter to run

The editor contains the complete fragment shader, including the grid and markers. These drawing helpers make measurements visible. The page supplies the uniforms; no external shader library is needed.

A complete ring shader

Paste this version into the editor to see the ring without the grid and measuring marker. Center, radius, thickness, and softness still come from the controls; the view selector does not affect this smaller shader.

#version 300 es
precision highp float;
uniform vec2 uResolution;
uniform vec2 uCenter;
uniform float uRadius;
uniform float uThickness;
uniform float uEdge; // Must be positive.
out vec4 fragColor;

void main() {
    vec2 p = (2.0 * gl_FragCoord.xy - uResolution) / uResolution.y;
    float distanceToCenter = length(p - uCenter);
    float distanceToCircle = distanceToCenter - uRadius;
    float ringDistance = abs(distanceToCircle) - uThickness * 0.5;
    float mask = 1.0 - smoothstep(-uEdge, uEdge, ringDistance);
    vec3 background = vec3(0.04, 0.06, 0.09);
    vec3 fill = vec3(0.29, 0.88, 0.56);
    fragColor = vec4(mix(background, fill, mask), 1.0);
}

A mistake worth making: change only X’s unit

In the editor, divide X by the width instead of the height:

vec2 p = (2.0 * gl_FragCoord.xy - uResolution) / uResolution;

On a wide canvas, one horizontal unit now covers more pixels than one vertical unit. The same distance formula produces an ellipse on screen. length cannot repair inconsistent units; it only measures the numbers it receives.

Restore division by uResolution.y for both components. One unit then equals half the drawing-buffer height in pixels. Radius 0.5 equals one quarter of that height: 100 pixels in a 400-pixel-high buffer. The diameter is half the height, regardless of width. Resizing changes the pixel count, while the shape stays round.

Your turn

Restore the full shader with Reset lab, then choose Exercise setup: center (0.2, -0.1), P (0.5, 0.3), radius 0.5, full thickness 0.12, and softness 0.015.

  1. Calculate P’s displacement, distance to the center, and signed distance to the circle. Check all three readouts.
  2. Move P to the center. Predict the sign of the circle distance and decide whether this point belongs to the ring.
  3. Set P to (0.7, -0.1), then (0.9, -0.1). Explain why the first is in the ring and the second is outside it.
  4. Resize the browser. Keep radius 0.5. Check that the circle stays round and its radius remains a quarter of the canvas height.
A hint

First calculate P - center. Its length ignores direction. Subtract the radius for the circle distance, then take the absolute value and subtract 0.06 for the ring test.

Check your result

Initially the displacement is (0.3, 0.4), its length is 0.5, and the circle distance is zero. The ring distance is -0.06, so P is in the middle of the ring.

At the center, length is zero, circle distance is -0.5, and ring distance is 0.44. The point is inside the circle but outside the ring, in its hole.

At (0.7, -0.1), length is 0.5 and ring distance is -0.06. At (0.9, -0.1), length is 0.7, circle distance is 0.2, and ring distance is 0.14: outside the ring.

What you can do now

You can measure a displacement and turn that distance into a radial mask. The check is concrete: move the center, build a ring, explain the signs at P, and keep the shape round when the canvas changes size.

We can now extract length from a vector. Next, we will keep its direction while choosing a different length.